 gitsilence 的个人博客
Coding...
Elasticsearch相关优化
Elasticsearch 相关优化
写入优化
使用默认的 _id
_id 字段的使用,应尽可能避免我们自己自定义_id, 以避免针对 ID 的版本管理;建议使用 ES 的默认 ID 生成策略或使用数字类型 ID 做为主键。
在索引具有显式 id 的文档时,Elasticsearch 需要检查具有相同 id 的文档是否已经存在于同一个分片中,这是一项代价高昂的操作,并且随着索引的增长而变得更加代价高昂。通过使用自动生成的 id,Elasticsearch 可以跳过此检查,从而加快索引速度。
索引初始化禁用副本
如果您有大量数据想要一次性全部加载到 Elasticsearch 中,那么设置 index.number_of_replicas 为 0 以加快索引速度可能会有所帮助。没有副本意味着丢失单个节点可能会导致数据丢失,因此重要的是数据位于其他地方,以便在出现问题时可以重试初始加载。初始加载完成后,您可以将 index.number_of_replicas 其设置回其原始值。
修改索引的副本数:
PUT index_name/_settings

{

    "number_of_replicas": 1

}
增大 refresh_interval 刷新间隔
在 Elasticsearch 中,写入和打开一个新段的轻量的过程叫做 refresh 。 默认情况下每个分片会每秒自动刷新一次。这就是为什么我们说 Elasticsearch 是 近 实时搜索: 文档的变化并不是立即对搜索可见,但会在一秒之内变为可见。
频繁刷新索引 也是有性能开销的。
es的写入原理:
大概分为三个步骤:write -> refresh -> flush
1、write:文档数据到内存缓存,并存到 translog
2、refresh:内存缓存中的文档数据,到文件缓存中的 segment 。此时可以被搜到。
3、flush 是缓存中的 segment 文档数据写入到磁盘
refresh_interval 配置索引的刷新间隔。
修改 refresh_interval 参数:
-
可以在创建索引的时候,配置
settings{ "settings": { "refresh_interval": "30s" } } -
直接修改索引的
refresh_intervalPUT index_name/_settings { "refresh_interval": "30s" }
默认情况下ElasticSearch索引的refresh_interval为1秒,这意味着数据写1秒才就可以被搜索到。
每次索引refresh会产生一个新的 lucene 段,这会导致频繁的 segment merge 行为,对系统 CPU 和 IO 占用都比较高。
如果产品对于实时性要求不高,则可以降低刷新周期,如:index.refresh_interval: 120s。
查询优化
深度分页问题
使用 search_after ,需要有排序的唯一字段,组合字段也可以,要保证唯一性
对于业务的需要,如果我们需要根据一些字段排序,需要将那些字段加到 search_after
查询示例:
// 查询第一页
GET search_test_02/_search
{
  "size": 2,
  "sort": [
    {
      "id": {
        "order": "desc"
      }
    }
  ]
}

// 查询第二页
GET search_test_02/_search
{
  "size": 2,
    // 这里的 6,是第一页的最后一条数据的 id
  "search_after": [6],
  "sort": [
    {
      "id": {
        "order": "desc"
      }
    }
  ]
}
使用 search_after 缺点:
- search_after 的字段要和排序字段保持一致、顺序也要一致,如果后期要根据其他字段进行排序,需要那个字段加到 search_after 中;限制了业务的本身
- 当 search_after 的字段增多,排序字段也随之增加,排序会占用大量的内存
过滤无用标签 - 自定义分词
-
Character Filter
在 Tokenizer 之前对文本进行处理,例如增加删除及替换字符。可以配置多个 Character Filter。会影响 Tokenizer 的 position 和 offset 信息
一些自带的 Character Filters:
- HTML strip - 去除 html 标签
- Mapping - 字符串替换
- Pattern replace - 正则匹配替换
-
Tokenizer
将原始文本按照一定的规则,切分为词(term or token)
Elasticsearch 内置Tokenizers:
- whitespace
- standard
- uax_url_email
- pattern
- keyword
- path hierarchy 文件路径
可以用 Java 开发插件,实现自己的 Tokenizer
-
Token Filter
处理 Tokenizer 输出的单词 (term 分词后的每一个词),进行增加、修改、删除
自带的Token Filter:
- Lowercase 将字母转成小写
- stop 去除停用词
- synonym 添加近义词
示例:
POST _analyze
{
    "tokenizer": "keyword",
    "char_filter": ["html_strip"],
    "text": "<h1>我是一级标题</h1> <br/> <span>我是一个span</span>"
}
{
“tokens”: [
{
“token”: “\n我是一级标题\n \n 我是一个span”,
“start_offset”: 0,
“end_offset”: 43,
“type”: “word”,
“position”: 0
}
]
}
使用 char_filter 进行替换
POST _analyze
{
    "tokenizer": "standard",
    "char_filter": [
        {
            "type": "mapping",
            "mappings": [
                ":) => happy",
                ":( => sad"
            ]
        }
    ],
    "text": "Tom feels :). Mary feels :("
}
{
“tokens”: [
{
“token”: “Tom”,
“start_offset”: 0,
“end_offset”: 3,
“type”: ““,
“position”: 0
},
{
“token”: “feels”,
“start_offset”: 4,
“end_offset”: 9,
“type”: ““,
“position”: 1
},
{
“token”: “happy”,
“start_offset”: 10,
“end_offset”: 12,
“type”: ““,
“position”: 2
},
{
“token”: “Mary”,
“start_offset”: 14,
“end_offset”: 18,
“type”: ““,
“position”: 3
},
{
“token”: “feels”,
“start_offset”: 19,
“end_offset”: 24,
“type”: ““,
“position”: 4
},
{
“token”: “sad”,
“start_offset”: 25,
“end_offset”: 27,
“type”: ““,
“position”: 5
}
]
}
正则的方式:
{
    "tokenizer": "standard",
    "char_filter": [
        {
            "type": "pattern_replace",
            "pattern": "http://(.*)",
            "replacement": "$1"
        }
    ],
    "text": "http://baidu.com"
}
{
“tokens”: [
{
“token”: “baidu.com”,
“start_offset”: 0,
“end_offset”: 16,
“type”: ““,
“position”: 0
}
]
}
空格 和 停用词
{
    "tokenizer": "whitespace",
    "filter": ["lowercase", "stop"],
    "text": "The Tom is a monkey on the tree!"
}
{
“tokens”: [
{
“token”: “tom”,
“start_offset”: 4,
“end_offset”: 7,
“type”: “word”,
“position”: 1
},
{
“token”: “monkey”,
“start_offset”: 13,
“end_offset”: 19,
“type”: “word”,
“position”: 4
},
{
“token”: “tree!”,
“start_offset”: 27,
“end_offset”: 32,
“type”: “word”,
“position”: 7
}
]
}
使用 自定义的分词 创建索引
PUT user_test_analyzer
{
    "settings": {
        "analysis": {
            "analyzer": {
                "my_custom_analyzer": {
                    "type": "custom",
                    "char_filter": [
                        "emoticons"
                    ],
                    "tokenizer": "punctuation",
                    "filter": [
                        "lowercase",
                        "english_stop"
                    ]
                }
            },
            "tokenizer": {
                "punctuation": {
                    "type": "pattern",
                    "pattern": "[.,!?]"
                }
            },
            "char_filter": {
                "emoticons": {
                    "type": "mapping",
                    "mappings": [
                        ":) => happy",
                        ":( => sad"
                    ]
                }
            },
            "filter": {
                "english_stop": {
                    "type": "stop",
                    "stopwords": "_english_"
                }
            }
        }
    },
    "mappings": {
        "_doc": {
            "properties": {
                "name": {
                    "type": "keyword",
                    "copy_to": "full_index"
                },
                "content": {
                    "type": "text",
                    "analyzer": "my_custom_analyzer",
                    "copy_to": "full_index"
                },
                "age": {
                    "type": "integer",
                    "copy_to": "full_index"
                }
            }
        }
    }
}
测试
POST /user_test_analyzer/_analyze{ "analyzer": "my_custom_analyzer", "text": "I'm a :) person, that looks :( , and you ?"}
{
“tokens”: [
{
“token”: “i’m a happy person”,
“start_offset”: 0,
“end_offset”: 15,
“type”: “word”,
“position”: 0
},
{
“token”: “ that looks sad “,
“start_offset”: 16,
“end_offset”: 31,
“type”: “word”,
“position”: 1
},
{
“token”: “ and you “,
“start_offset”: 32,
“end_offset”: 41,
“type”: “word”,
“position”: 2
}
]
}
优化全文索引字段
创建索引的时候,不用创建全文检索字段;在需要索引的字段使用 copy_to
1、创建测试索引
PUT copy_search
{
  "mappings": {
    "_doc": {
      "properties": {
        "name": {
          "type": "keyword",
          "copy_to": "full_index"
        },
        "content": {
          "type": "text",
          "copy_to": "full_index"
        },
        "age": {
          "type": "integer"
        }
      }
    }
  }
}
2、插入数据
POST copy_search/_doc
{
  "name": "zhangsan",
  "content": "I'm :)",
  "age": 18
}
3、全文检索
GET copy_search/_search
{
  "query": {
    "bool": {
      "filter": {
        "match": {
          "full_index": "zhangsan"
        }
      }
    }
  }
}
// result
{
  "took": 2,
  "timed_out": false,
  "_shards": {
    "total": 5,
    "successful": 5,
    "skipped": 0,
    "failed": 0
  },
  "hits": {
    "total": 2,
    "max_score": 0,
    "hits": [
      {
        "_index": "copy_search",
        "_type": "_doc",
        "_id": "kcKv534BLSHkQNHCbGTu",
        "_score": 0,
        "_source": {
          "name": "zhangsan",
          "content": "I'm :)",
          "age": 18
        }
      },
      {
        "_index": "copy_search",
        "_type": "_doc",
        "_id": "ksKx534BLSHkQNHCxWQS",
        "_score": 0,
        "_source": {
          "name": "zhangsan wanger 喂你好",
          "content": "I'm :)",
          "age": 19
        }
      }
    ]
  }
}
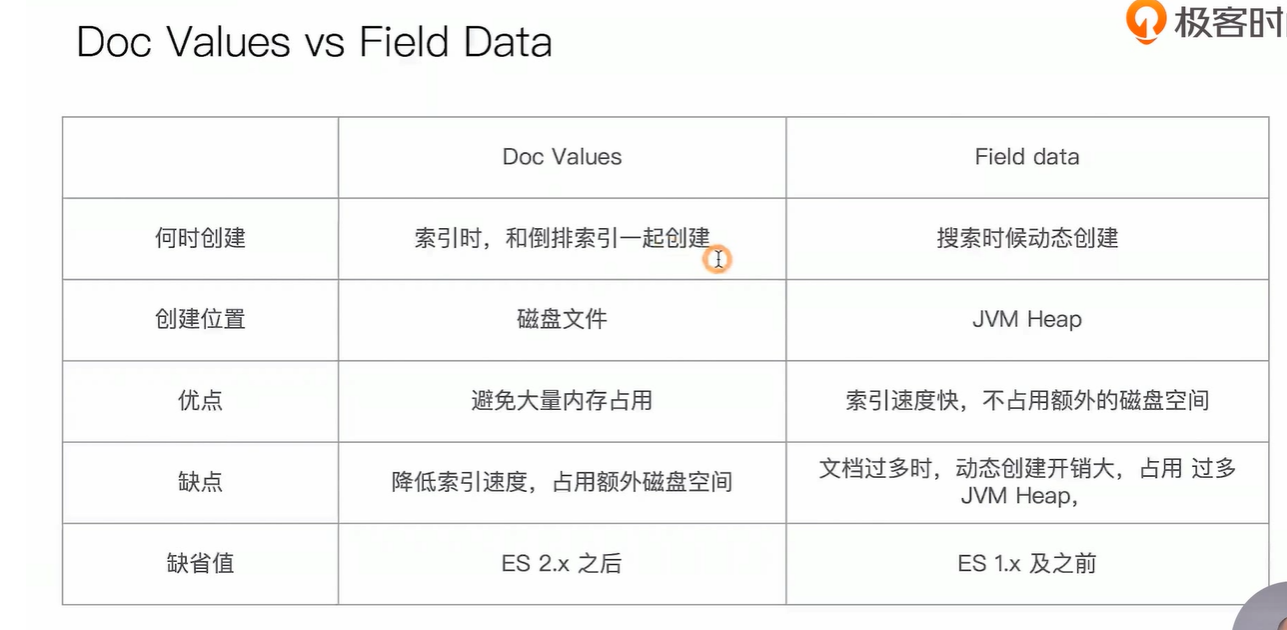
非检索字段,不分词、不索引
如果你不会执行基于一个确定的子段 聚合、排序或执行脚本(Script ),你可以选择关闭Doc Values;节省磁盘空间,提高索引数据的速度。
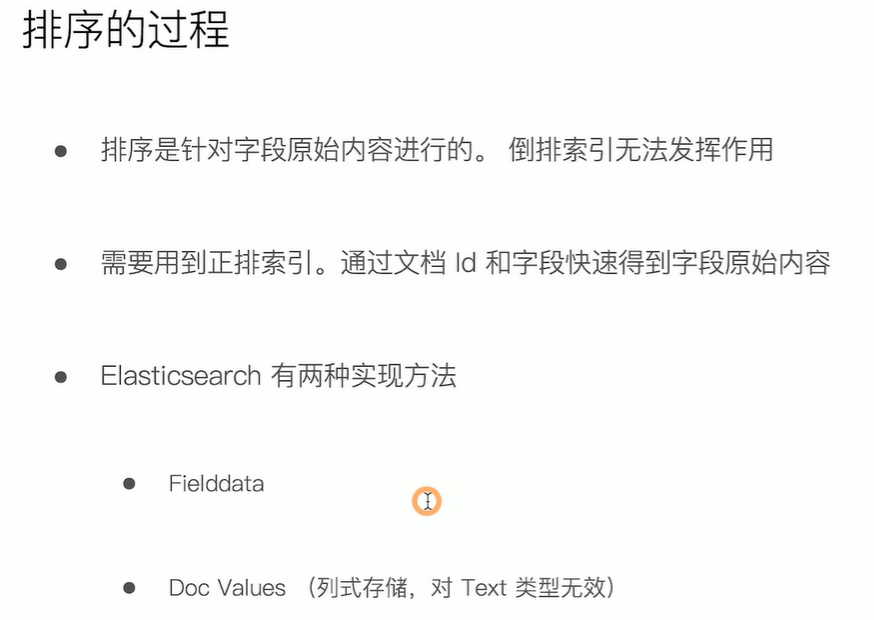
doc_values 默认启用,可以通过 Mapping 设置关闭;关闭之后,可以增加索引速度、减少磁盘
如果重新打开,需要重建索引
当明确不需要做排序及聚合分析时,可以关闭
{
    "mappings": {
        "_doc": {
            "properties": {
                "name": {
                    "type": "keyword",
                    "copy_to": "full_index"
                },
                "content": {
                    "type": "text",
                    "index": "not_analyzed",
                    "doc_values": false,
                    "copy_to": "full_index"
                },
                "age": {
                    "type": "integer",
                    "copy_to": "full_index"
                }
            }
        }
    }
}
字段用下面的设置,该字段 支持聚合,但不支持查询,因为不会对这个字段生成倒排索引
{
    "type":       "string",
    "index":      "not_analyzed",
    "doc_values": true,
    "index": "no"
}
**数据查询 **
因为我们创建索引的时候,使用了别名,又使用了滚动索引,所以我们查询的时候,只需要查询 索引的别名即可。
由于我们设置设置别名的时候,设置 is_write_index: true ,所以查询的时候,会自动查询所有的 索引(原理不详);写入的时候会写入最新的索引上。
目前只支持 elasticsearch 7.x
常规优化
对于 T+1 的数据新增,每天凌晨数据跑完,xshell 调用ES强制合并优化。
强制合并API:https://doc.codingdict.com/elasticsearch/205/
强制合并API允许通过API强制合并一个或多个索引。合并依赖于Lucene索引在每个分片中保存的分段数。强制合并操作允许通过合并分段来减少他们的数量。
此调用会阻塞,直到合并完成。如果 http 连接丢失,请求将在后台继续,并且任务新的请求都会阻塞,直到前面的强制合并完成
段合并的原理和作用:https://www.jianshu.com/p/661e6fe98602
索引管理
Rollover API 滚动创建索引
滚动索引一般可以与索引模板结合使用,实现按一定条件
示例 - 1
-
创建索引
PUT nginx-logs-00001
{
    "aliases": {
        "nginx-logs-write": {}
    }
}
{ - "nginx-logs-00001": { - "aliases": { - "nginx-logs-write": { - } }, "mappings": { - "properties": { - "log": { - "type": "text", "fields": { - "keyword": { - "type": "keyword", "ignore_above": 256 } } } } }, "settings": { - "index": { - "routing": { - "allocation": { - "include": { - "_tier_preference": "data_content" } } }, "number_of_shards": "1", "provided_name": "nginx-logs-00001", "creation_date": "1642647405156", "number_of_replicas": "1", "uuid": "JL96u8LpQ_SHPVBt2oJYhQ", "version": { - "created": "7160399" } } } } } -
插入数据,插入 6 条数据
POST nginx-logs-write/_doc
{
    "log": "something"
}
{ -
"count": 6,
"_shards": { -
"total": 1,
"successful": 1,
"skipped": 0,
"failed": 0
}
} -
执行 rollover API
POST	nginx-logs-write/_rollover
{
    "conditions": {
        "max_age": "1d",
        "max_docs": 5,
        "max_size": "5gb"
    }
}
{ - "acknowledged": true, "shards_acknowledged": true, "old_index": "nginx-logs-00001", "new_index": "nginx-logs-000002", "rolled_over": true, "dry_run": false, "conditions": { - "[max_age: 1d]": false, "[max_docs: 5]": true, "[max_size: 5gb]": false } }此时 nginx-logs-write 已指向 索引 nginx-logs-000002
我们再往
nginx-logs-write插入 1 条数据的时候,实际数据已经落入到索引nginx-logs-write-000002此时
nginx-logs-write-00001有 6 条数据,nginx-logs-write-000002有 1 条再查询
nginx-logs-write数据条数为 7 条
示例 - 2
-
创建索引
PUT apache-logs-000001 { "aliases": { "apache-logs-write": { "is_write_index": true } } } -
插入两条数据
POST apache-logs-write/_doc { "logs": "something" } -
执行 rollover API
POST apache-logs-write/_rollover { "conditions": { "max_age": "1d", "max_docs": 1, "max_size": "5gb" } } -
继续插入数据
-
查看
apache-logs-write数量 = 之前所有索引中数据的总和
经测试发现,elasticsearch 6.3.2 版本不能用上述的方式,可以使用如下方案
1、首先我们创建一个索引,nginx-logs-000001
{
  "aliases": {
    "nginx-logs": {
    }
  }
}
2、插入数据之后执行 rollover API
3、需要改变的是 我们查询的时候不再使用 别名,使用匹配符的形式;例如:
GET /nginx-logs-*/_search
{
	"query": {
		"match_phrase": {
			"logs": "115"
		}
	}
}
当索引越来越多,压力也会很大;
创建索引别名
1、已有索引创建别名
PUT index_name/_alias/别名
2、批量创建别名
PUT _aliases?pretty
{
  "actions": [
    {
      "add": {
        "index": "yx-search-chat-other-000001",
        "alias": "chat-other-rollover"
      }
    },
    {
      "add": {
        "index": "yx-search-chat-other-000001",
        "alias": "chat-other-rollover-02"
      }
    }
    ]
}
索引的生命周期
索引的生命周期是在 Elasticsearch 6.6 之后引入的,所以 6.3.2 版本是不支持的。
配合 IndexTemplate、Rollover 当索引满足一定条件,滚动创建索引。
案例:
创建一个索引,当索引中的文档数满足 3 个时,自动创建新的索引。
1、创建索引的声明周期
PUT /_ilm/policy/ph-policy?pretty
{
  "policy": {
    "phases": {
      "hot": {
        "min_age": "0ms",
        "actions": {
          "set_priority": {
            "priority": 100
          },
          "rollover": {
            "max_age": "30d",
            "max_docs": 3,
            "max_size": "5gb"
          }
        }
      }
    }
  }
}
2、创建索引模板
作用于以 ph- 开头的索引,并默认创建一个别名 ph-read-alias
PUT /_template/ph_template
{
  "index_patterns": ["ph-*"],
  "aliases": {
    "ph-read-alias": {}
  },
  "settings": {
    "index": {
      "lifecycle": {
        "name": "ph-policy",
        "rollover_alias": "ph-write-alias"
      },
      "refresh_interval": "30s",
      "number_of_shards": "2",
      "number_of_replicas": 1
    }
  },
  "mappings": {
    "properties": {
      "name": {
        "type": "keyword"
      }
    }
  }
}
3、创建符合条件的索引
创建一个可写入的别名
PUT ph-user-000001
{
  "aliases": {
    "ph-write-alias": {
      "is_write_index": true
    }
  }
}
4、查看索引的信息
GET ph-user-000001
查看索引是否符合我们的预期
5、连续插入多条数据
POST ph-write-alias/_doc
{
  "name": "hh"
}
由于我们设置 rollover 条件是 文档数 >= 3,当超过 3 条数据后,可以发现索引还是原来的,并没有创建新的索引。
6、修改 ilm 刷新的周期时间
elasticsearch 加载 ilm 的周期,默认是 10 分钟,可以改成 3 秒,否则 10 分钟才会检查一次,不方便我们的测试
PUT _cluster/settings
{
  "transient": {
    "indices.lifecycle.poll_interval": "3s"
  }
}
获取别名 对应的信息
GET ph-write-alias
此时该别名应该对应很多索引,我们可以一直插入数据,观察索引是否自动创建了;我们查询的时候可以根据这个别名进行查询,查询的是所有的索引,当索引数太多的时候,查询效率会有所降低。
分片设计与管理
每个索引

参考来源
1、知乎:https://zhuanlan.zhihu.com/p/43437056
2、官网优化建议:https://www.elastic.co/guide/en/elasticsearch/reference/current/tune-for-indexing-speed.html
3、官网近实时搜索:https://www.elastic.co/guide/cn/elasticsearch/guide/current/near-real-time.html
4、interval_refresh :
5、Elasticsearch 生命周期管理那些事:
- https://blog.csdn.net/u011775740/article/details/105514902/
- 一文详解 elasticsearch 的索引生命周期管理—rollover+curator—ilm: https://blog.csdn.net/microGP/article/details/114362960
6、Rollover API