 gitsilence 的个人博客
Coding...
linux常用命令

linux常用命令
多个linux服务器之间的免密登录
**三台服务器如下: **
| IP | Release | Hostname |
|---|---|---|
| 192.168.100.1 | centos | server-01 |
| 192.168.100.2 | centos | server-02 |
| 192.168.100.3 | centos | server-03 |
实现server-01免密登录server-02和server-03
-
在服务器server-01中运行指令, 然后一路回车即可.
指令:
ssh-copy-id -i /root/.ssh/id_rsa.pub root@192.168.100.2
root@server-01:/#  ssh-keygen -t rsa

Generating public/private rsa key pair.
Enter file in which to save the key (/root/.ssh/id_rsa):  #回车代表无需密码登录

Enter passphrase (empty for no passphrase):  #回车

Enter same passphrase again:
#回车

Your identification has been saved in /root/.ssh/id_rsa. #私匙
Your public key has been saved in /root/.ssh/id_rsa.pub. #公匙

The key fingerprint is:
SHA256:*************************************** root@localhost.localdomain
The key's randomart image is:
+---[RSA 2048]----+
|o.**o.           |
|=. ==.           |
|==++.= +         |
|o.=.+ B          |
|oo ... .S        |
|oo.. . .         |
|+.o.  .          |
|BE++             |
|OO+..            |
+----[SHA256]-----+

root@server-01:/#  ssh-copy-id -i /root/.ssh/id_rsa.pub root@192.168.100.2

/usr/bin/ssh-copy-id: INFO: Source of key(s) to be installed: "/root/.ssh/id_rsa.pub"
The authenticity of host '192.168.100.2 (192.168.100.2)' can't be established.
ECDSA key fingerprint is SHA256:t3gHkrI7nBW2HNoRoD/9CYAIk1a4DDZ8LybenqXukms.
ECDSA key fingerprint is MD5:d2:11:22:73:ba:e7:67:ad:80:e6:c0:53:32:a6:2e:94.
Are you sure you want to continue connecting (yes/no)?  yes
#这里直接回答 yes

/usr/bin/ssh-copy-id: INFO: attempting to log in with the new key(s), to filter out any that are already installed
/usr/bin/ssh-copy-id: INFO: 1 key(s) remain to be installed -- if you are prompted now it is to install the new keys
root@192.168.100.2's password:  # 这里输入server-02的root密码

Number of key(s) added: 1

Now try logging into the machine, with:   "ssh 'root@192.168.100.2'"
and check to make sure that only the key(s) you wanted were added.
连接另外一台操作也是一样的
ssh-copy-id -i /root/.ssh/id_rsa.pub root@192.168.100.3
后续操作也是一样的....
git多个公钥生成与管理
生成公钥,并指定名称。
ssh-keygen -t rsa -C "邮箱" -f ~/.ssh/company/id_rsa_for_lf
然后进入 ~/.ssh/文件夹,创建config文件,并赋予600权限
chmod 600 ./config
填写config内容
Host MrNiebit
HostName github.com
User git
IdentityFile ~/.ssh/id_rsa

Host JingLifan
HostName github.com
User git
IdentityFile ~/.ssh/company/id_rsa_for_lf
然后测试一下即可。
ssh -T MrNiebit
拉GitHub项目
例如:git@github.com:MrNiebit/douyin-janalysis.git
可以写成:MrNiebit:MrNiebit/douyin-janalysis.git
将
git clone MrNiebit:MrNiebit/douyin-janalysis.git
linux之间互相传输文件(本地linux下载服务器linux)
- scp指令
将本地文件,传输到另外一台linux主机上。
scp 本机文件 服务器地址@root:服务器的路径
# 例如, 将douyu.py上传到服务器中/usr/local/python的路径下
scp ./douyu.py 192.168.100.2:/usr/local/python/
将服务器上的文件,下载到本机上。
scp root@公网ip:/home/root/test.txt /home/gitsilence/
查看正在运行的任务
- ps
- ps -ef|grep 任务名 // 搜索正在执行任务, -ef 显示详细信息
- ps -A 显示当前所有正在运行的任务
- tail 尾部
- head 头部
- ps -ef|tail -5 取最后5个正在运行的任务
- ps -ef|head -5 取前4个正在运行的任务
- netstat -tnlp 查看当前正在使用的端口号
screen命令, 使任务在服务器退出之后保持运行
安装命令:
yum install screen -y
[root@localhost /]# rpm -qa|grep screen
screen-4.1.0-0.25.20120314git3c2946.el7.x86_64
# 显示这个, 则已经安装成功
- 创建一个名字叫happy的会话
screen -S happy
- 查看已有会话
screen -ls
- 连接会话
screen -r happy
- 保存当前会话,并退出
- 第一种方式
screen -d 会话的名字
- 第二种方式
ctrl + actrl + d
- 第一种方式
centos的防火墙的开启与关闭
-
开启端口
firewall-cmd --zone=public --add-port=80/tcp --permanent -
查询端口号80 是否开启:
firewall-cmd --query-port=80/tcp -
重启防火墙:
firewall-cmd --reload -
查询有哪些端口是开启的:
firewall-cmd --list-port
命令含义:
--add-port=80/tcp #添加端口,格式为:端口/通讯协议
--permanent #永久生效,没有此参数重启后失效
关闭firewall:
systemctl stop firewalld.service #停止firewall
systemctl disable firewalld.service #禁止firewall开机启动
apt-get update报错
W: Unknown Multi-Arch type 'no' for package 'compiz-core'x
W: Unknown Multi-Arch type 'no' for package 'compiz-gnome'
W: Ignoring Provides line with DepCompareOp for package xserver-xorg
W: Ignoring Provides line with DepCompareOp for package php-math-biginteger
W: Ignoring Provides line with DepCompareOp for package pypy-cffi
W: Ignoring Provides line with DepCompareOp for package pypy-cffi-backend-api-max
W: Ignoring Provides line with DepCompareOp for package pypy-cffi-backend-api-min
W: You may want to run apt-get update to correct these problems
解决方法: apt-get install -f apt
unzip 解压文件名乱码
由于图片的名字是中文名,解压后,出现了文件名乱码情况。
可参考:https://www.zhihu.com/question/20523036/answer/1288192023
也可以使用命令
unzip -O cp936 压缩包名
常用命令收集
-
vim命令
-
查询指定字符串
正常模式, /字符串 ,然后回车 查询,按 n 查询下一个匹配的
-
跳到首行和末行
命令模式: :1 跳到 第一行, :$ 跳到最后一行
或者使用正常模式: 按gg 到第一行,按 shift + g 跳到 最后一行
-
统计 字符串 出现的 个数
命令模式: :%s/字符串/字符串/ng 两个字符串相同, 第二个字符串是为了防止误替换。
-
替换指定字符串
命令模式::%s/字符串1/字符串2/g 这里没有加n, 会将第一个字符串全部替换成 第二个字符串
-
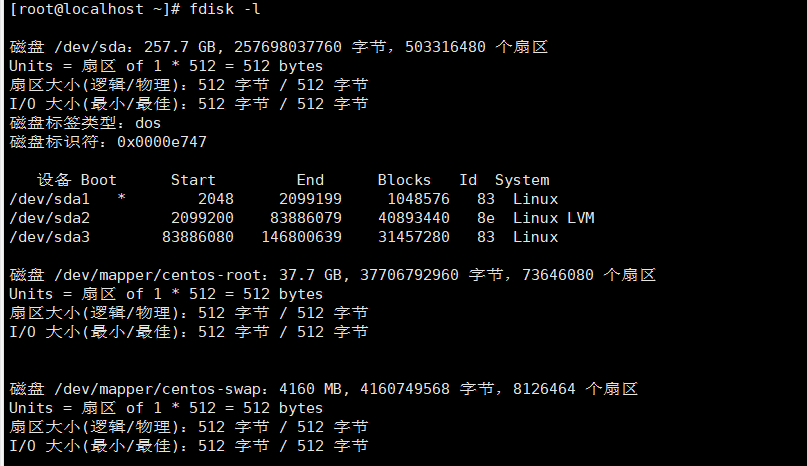
Linux 硬盘分区并挂载
# 查看
fdisk -l
对数据盘 sda 进行分区
[root@localhost ~]# fdisk /dev/sda
欢迎使用 fdisk (util-linux 2.23.2)。

更改将停留在内存中,直到您决定将更改写入磁盘。
使用写入命令前请三思。


命令(输入 m 获取帮助):n
Partition type:
   p   primary (3 primary, 0 extended, 1 free)
   e   extended
Select (default e): p
已选择分区 4
起始 扇区 (146800640-503316479,默认为 146800640):
将使用默认值 146800640
Last 扇区, +扇区 or +size{K,M,G} (146800640-503316479,默认为 503316479):+30G
分区 4 已设置为 Linux 类型,大小设为 30 GiB

命令(输入 m 获取帮助):wq
The partition table has been altered!

Calling ioctl() to re-read partition table.

WARNING: Re-reading the partition table failed with error 16: 设备或资源忙.
The kernel still uses the old table. The new table will be used at
the next reboot or after you run partprobe(8) or kpartx(8)
正在同步磁盘。
使用 fdisk -l 查看,多了个 /dev/sda4
格式化分区 (如果对正在使用的硬盘进行分区,可以会失败,重启下再执行即可)
mkfs.ext4 /dev/sda4
挂载分区(这种方式挂载分区不用重启,但每次启动都要去挂载)
mount /dev/sda4 /node02
如果想每次开机自动挂载分区,需要修改/etc/fstab 文件(这种方式一劳永逸)
#
# /etc/fstab
# Created by anaconda on Sun Jun 13 00:26:07 2021
#
# Accessible filesystems, by reference, are maintained under '/dev/disk'
# See man pages fstab(5), findfs(8), mount(8) and/or blkid(8) for more info
#
/dev/mapper/centos-root /                       xfs     defaults        0 0
UUID=7e423d4d-fa8d-4171-b292-9d0033efa427 /boot                   xfs     defaults        0 0
/dev/mapper/centos-swap swap                    swap    defaults        0 0
/dev/sda3 /node02                               ext4    defaults        0 1
~
参考教程:https://blog.csdn.net/ljihe/article/details/52293724
挂载xfs格式
mkfs.xfs /dev/sde
等待命令执行之后,执行挂载命令
mount /dev/sde /home/data/storage1
统计当前目录文件个数
不包含子目录下
ls|wc -l
ls -l|grep "^-"|wc -l
先列出详细目录,检索到以 - 开头的,并统计个数;文件是以 - 开头的,文件夹是以 d 开头的;
统计包含子目录下的文件的个数
ls -lR|grep "^-"|wc -l
显示当前目录指定个数的文件列表
当前目录只显示10个文件
ls|head -n 10
不要用 ll, 这个命令会包含一行 total (当前目录下占用数据块)。就是会多算一条
当前目录文件列表按时间逆序排列
ll -t
当前目录文件列表按照时间顺序排列
ll -r
查看文件内容16进制形式展示
完整内容地址:https://blog.csdn.net/yzhang6_10/article/details/81588282
hexdump 命令
- -C 输出规范的十六进制和ASCII码
- -n length 格式化输出文件的前length个字节
- -b 单字节八进制显示
- .....
使用用例
hexdump -C -n 200 ./1.mp4
定时删除脚本
#!/bin/bash
# 需要删除文件所在的目录
dir=/root/tmp
# 需要删除文件的后缀名
file_suffix="zip"
minutes=30
# 获取 修改时间在30分钟之前的文件列表,并排除/root/tmp目录 -maxdepth 递归深度为1 即为不递归
files=$(find $dir -maxdepth 1 +$minute|grep -v "$dir$")

for file in $files
    do
  	# '#'是去掉左边,'##'最后一个
	# '%'是去掉右边,'%%'第一个
	extension=${file##*.}
	if [ $extension == $file_suffix ]; then
	    # 如果不为空
	    if [ -n $file ]; then
		rm -rf $file
	    fi
	fi
    done;
批量修改文件的dos/unix格式转换
摘抄地址:https://blog.csdn.net/changqing1234/article/details/58585462/
DOS/Windows和Linux/Unix的文件换行回车格式不同,基于 DOS/Windows 的文本文件在每一行末尾有一个 CR(回车)和 LF(换行),而 UNIX 文本只有一个换行。
对于换行这个动作,unix下一般只有一个0x0A表示换行("\n"),windows下一般都是0x0D和0x0A两个字符("\r\n"),苹果机(MAC OS系统)则采用回车符CR表示下一行(\r)
Unix系统里,每行结尾只有“<换行>”,即“\n”;
Windows系统里面,每行结尾是“<回车><换行>”,即“\r\n”;
Mac系统里,每行结尾是“<回车>”,即“\r”。
一个直接后果是,Unix/Mac系统下的文件在Windows里打开的话,所有文字会变成一行;而Windows里的文件在Unix下打开的话,在每行的结尾会多一个^M字符。即 "\r" = ^M
Dos和windows采用回车+换行 CR+LF(\r\n)表示下一行,即^M$($不是换行符的表示,换行符没有表示出来,$是文本结束EOF的表示);
UNIX/Linux采用换行符LF表示下一行,即\n;LF使用'\n'符号表示, ASCII代码是10, 十六制为0x0A.
MAC 系统则采用回车符CR表示下一行,即\r;CR用符号'\r'表示, 十进制ASCII代码是13, 十六进制代码为0x0D;
所以Windows平台上换行在文本文件中是使用 0d 0a 两个字节表示, 而UNIX和苹果平台上换行则是使用0a或0d一个字节表示.由于dos风格的换行使用\r\n,把这样的文件上传到unix,有些版本的vi不能识别\r,所以vi显示时在行尾会出现^M出来,但是有些就能识别\r\n,正常显示回车换行。
sed -i 's/\r$//g' 文件名
sed 's/搜索的字符串/替换新字符串/g'
搜索 以 \r 结尾的,替换成 空
后面的文件名可以改成 * 表示作用于当前目录的所有文件
Linux创建service - 开机自启
vim /etc/systemd/system/redis-server.service
[Unit]
Description=redis-server service  // 描述
Wants=network-online.target // 依赖网络服务
After=network-online.target  // 在网络服务启动后启动

[Service]
Type=simple
ExecStart=/usr/local/bin/redis-server /opt/redis_install/redis-stable/redis.conf // 启动
ExecReload=/bin/kill -HUP $MAINPID // 重启
RestartSec=5s // 时间
Restart=on-failure // 失败自动重启

[Install]
WantedBy=multi-user.target // 多用户可用
# 开启服务
service redis-server start

# 服务状态
service redis-server status

# 关闭服务
service redis-server stop

# 将服务设置为开机自启
systemctl enable redis-server

# 关闭服务的开机自启
systemctl disable redis-server
端口还在,端口不通
排除网络问题
由于 jvm OOM,导致大量请求堆积在tcp队列中
-
查看特定本地端口的连接数
ss -s -t sport = :8081会显示本地端口的连接建立情况
-
根据IP地址过滤,查看连接情况
ss -s -t daddr = 127.0.0.1 sport = :8081
https://www.cnblogs.com/chopper-poet/p/14618391.html
导出 JVM 快照命令
jmap -dump:format=b,file=/path/to/dump.bin pid
线上修改jar包,解压和归档命令
# 解压
jar -xf xxx.jar

# 归档
jar -cvfM0 xxx.jar .
-c:创建jar压缩文件
-v:输出详细内容
-M:不创建清单文件,META-INF中已经包含
-0:不压缩
ffmpeg 常用命令
下载m3u8导出mp4
ffmpeg -i "https://xxx.com/hls/index.m3u8" -c copy -bsf:a aac_adtstoasc output.mp4
移除mp4中的片段
# 裁剪第一部分(从开始到第 30 秒)
ffmpeg -i input.mp4 -ss 00:00:00 -to 00:00:30 -c copy part1.mp4

# 裁剪第二部分(从第 43 秒到第 1 小时 29 分钟)
ffmpeg -i input.mp4 -ss 00:00:43 -to 01:29:00 -c copy part2.mp4

# 创建 filelist.txt
echo file 'part1.mp4' > filelist.txt
echo file 'part2.mp4' >> filelist.txt

# 合并视频
ffmpeg -f concat -safe 0 -i filelist.txt -c copy output.mp4

# 检查结果
ffmpeg -i output.mp4

# 清理临时文件
rm part1.mp4 part2.mp4 filelist.txt
- linux常用命令
- 多个linux服务器之间的免密登录
- git多个公钥生成与管理
- linux之间互相传输文件(本地linux下载服务器linux)
- 查看正在运行的任务
- screen命令, 使任务在服务器退出之后保持运行
- centos的防火墙的开启与关闭
- apt-get update报错
- unzip 解压文件名乱码
- 常用命令收集
- Linux 硬盘分区并挂载
- 挂载xfs格式
- 统计当前目录文件个数
- 显示当前目录指定个数的文件列表
- 当前目录文件列表按时间逆序排列
- 当前目录文件列表按照时间顺序排列
- 查看文件内容16进制形式展示
- 定时删除脚本
- 批量修改文件的dos/unix格式转换
- Linux创建service - 开机自启
- 端口还在,端口不通
- 线上修改jar包,解压和归档命令
- ffmpeg 常用命令
- 下载m3u8导出mp4
- 移除mp4中的片段