 gitsilence 的个人博客
Coding...
Elasticsearch搭建集群

Elasticsearch搭建集群
使用 的es版本都是 7.9.2的
window版本
安装问题见:http://blog.lacknb.cn/articles/2020/10/11/1602424587412.html
复制es压缩包,总共三个,解压
-
第一个config/elasticsearch.yml 作为主节点 master
# 集群名称 cluster.name: elasticsearch # # ------------------------------------ Node ------------------------------------ # # Use a descriptive name for the node: # 节点名称 node.name: master # 是否参与master选举 node.master: true # network.host: 127.0.0.1 # # Set a custom port for HTTP: # http.port: 9200 # 解决跨域 这样head插件就可以访问 http.cors.enabled: true http.cors.allow-origin: "*" -
第二个 yml文件 作为子节点 slave1
# 集群名称 cluster.name: elasticsearch # # ------------------------------------ Node ------------------------------------ # # Use a descriptive name for the node: # 节点名称 node.name: slave1 # 是否参与master选举 默认为true # node.master: true network.host: 127.0.0.1 # # Set a custom port for HTTP: # http.port: 9201 # 解决跨域 这样head插件就可以访问 # http.cors.enabled: true # http.cors.allow-origin: "*" # 发现主节点(通过主节点的ip) discovery.zen.ping.unicast.hosts: ["127.0.0.1"] -
第三个yml文件,作为子节点slave2
# 集群名称
cluster.name: elasticsearch
#
# ------------------------------------ Node ------------------------------------
#
# Use a descriptive name for the node:
# 节点名称
node.name: slave2

network.host: 127.0.0.1
#
# Set a custom port for HTTP:
#
http.port: 9202

# 解决跨域 这样head插件就可以访问
# http.cors.enabled: true
# http.cors.allow-origin: "*"

# 发现主节点(通过主节点的ip)
discovery.zen.ping.unicast.hosts: ["127.0.0.1"]
linux版本
解压压缩包
tar -zxvf elasticsearch-7.9.2-linux-x86_64.tar.gz
更改文件夹的名字
mv elasticsearch-7.9.2 es_master_7.9.2
运行 bin/elasticsearch -d 报错
can not run elasticsearch as root
为了安全,不允许以root的方式启动。
-
创建用户
adduser elasticsearch -
设置密码
passwd elasticsearch -
将es文件夹的权限赋给该用户
chown -R elasticsearch es_master_7.9.2 -
切换到elasticsearch用户
su elasticsearch -
进入bin目录启动
./elasticsearch -d
问题1:
max file descriptors [4096] for elasticsearch process is too low, increase to at least [65535]
[2]: the default discovery settings are unsuitable for production use; at least one of [discovery.seed_hosts, discovery.seed_providers, cluster.initial_master_nodes] must be configure
elasticsearch用户拥有的可创建文件描述的权限太低,至少需要65536;
最大虚拟内存太小
解决办法:
切换到root用户修改
vim /etc/security/limits.conf
在最后面追加下面内容
* hard nofile 65536
* soft nofile 65536
*** 是启动ES的用户
改完之后,记得重启linux。
问题2:
宿主机无法访问:http://192.168.44.130:9200
但是docker启动的es,是可以访问的。
宿主机能ping通,防火墙 端口已开放。
一般情况下web服务都是默认监听本地的地址,例如ES会监听127.0.0.1:9200,如果从别的主机来访问,那就需要重新设置监听地址。因此需要修改ES配置文件更改其监听地址。具体修改如下
在ES的配置文件/config/elasticsearch.yml 中新增配置项
network.host: 0.0.0.0
http.port: 9200
transport.host: localhost
transport.tcp.port: 9300
重启es,宿主机然后可以访问了。
接下来尝试部署集群
-
编辑第一台es的配置文件
# ----------------------------------------------------------------------- cluster.name: "elasticsearch" network.host: 0.0.0.0 # custom config node.name: "master" discovery.seed_hosts: ["127.0.0.1", "[::1]"] cluster.initial_master_nodes: ["master", "slave01", "slave02"] # 开启跨域访问支持,默认为false http.cors.enabled: true # 跨域访问允许的域名地址,(允许所有域名)以上使用正则 http.cors.allow-origin: /.*/ -
第二台
# -----------------------------------------------------------------------

cluster.name: "elasticsearch"
network.host: 0.0.0.0
http.port: 9201

# custom config
node.name: "slave01"
discovery.seed_hosts: ["127.0.0.1", "[::1]"]
cluster.initial_master_nodes: ["slave01", "master", "slave02"]
# 开启跨域访问支持,默认为false
http.cors.enabled: true
# 跨域访问允许的域名地址,(允许所有域名)以上使用正则
http.cors.allow-origin: /.*/
-
第三台
cluster.name: "elasticsearch"
network.host: 0.0.0.0
http.port: 9202

# custom config
node.name: "slave02"
discovery.seed_hosts: ["127.0.0.1", "[::1]"]
cluster.initial_master_nodes: ["slave01", "master", "slave02"]
# 开启跨域访问支持,默认为false
http.cors.enabled: true
# 跨域访问允许的域名地址,(允许所有域名)以上使用正则
http.cors.allow-origin: /.*/
成功页面
192.168.44.130 10 97 61 2.79 2.18 1.33 dilmrt - slave02
192.168.44.130 13 97 65 2.79 2.18 1.33 dilmrt - slave01
192.168.44.130 12 97 55 2.79 2.18 1.33 dilmrt * master
两台机器集群
两台电脑,系统都是win10,都是在虚拟机上运行es。
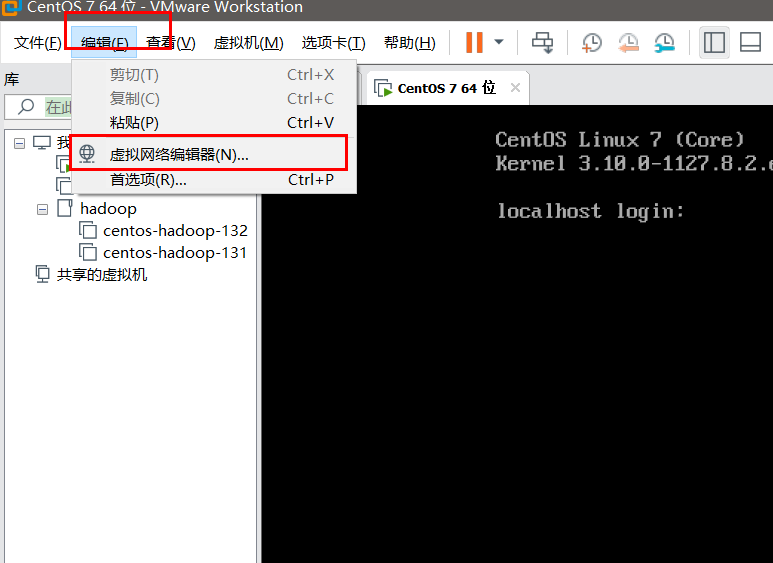
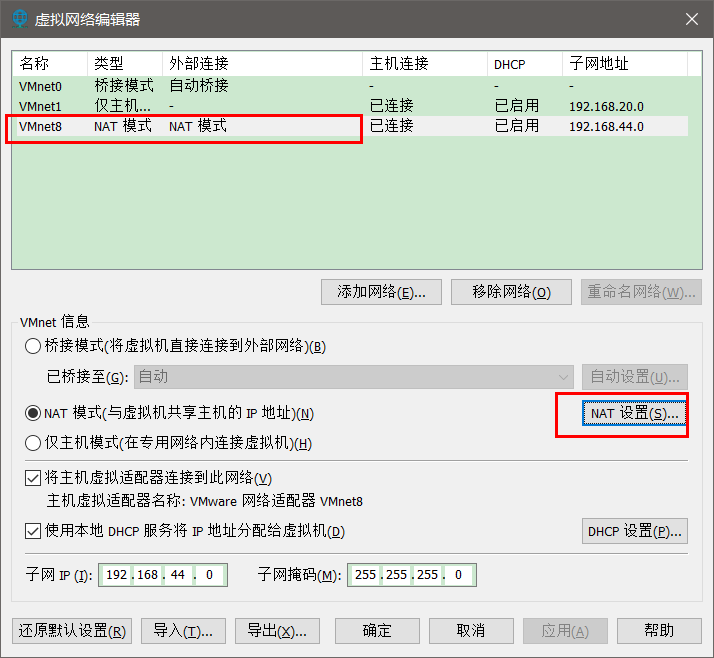
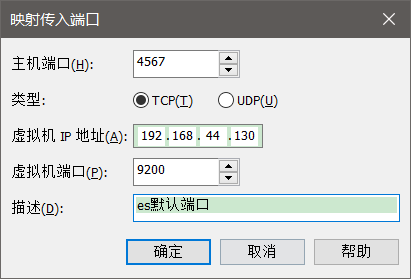
需要弄好端口转发,暂时 最好 都映射 9200,9300 端口


这里最好用9200,别用图中的端口。

这里用同样的方法映射9300
两台机器都要进行此操作。

修改完之后,宿主机的该端口已经运行了。
需要远程另外一台机器虚拟机中的linux的,要把22端口也要映射。注意要把window的防火墙关闭。
linux的防火墙也要关闭。

将es部署到另一台机器。
es正常运行即可。注意之前的一些坑。
ps:
这里两台机器在同一局域网下,自行查看ip地址。
这里分别为:192.168.1.10和192.168.1.11
-
第一个机器的配置文件
# ----------------------------------------------------------------------- cluster.name: "elasticsearch" network.host: 0.0.0.0 network.publish_host: 192.168.1.10 # custom config node.name: "master" discovery.seed_hosts: ["192.168.1.11"] cluster.initial_master_nodes: ["master", "slave01"] # 开启跨域访问支持,默认为false http.cors.enabled: true # 跨域访问允许的域名地址,(允许所有域名)以上使用正则 http.cors.allow-origin: /.*/ -
第二台机器的配置文件
# -----------------------------------------------------------------------

cluster.name: "elasticsearch"
network.host: 0.0.0.0

network.publish_host: 192.168.1.10

# custom config
node.name: "master"
discovery.seed_hosts: ["192.168.1.11"]
cluster.initial_master_nodes: ["master", "slave01"]
# 开启跨域访问支持,默认为false
http.cors.enabled: true
# 跨域访问允许的域名地址,(允许所有域名)以上使用正则
http.cors.allow-origin: /.*/
如果不行,记得清除data中的数据
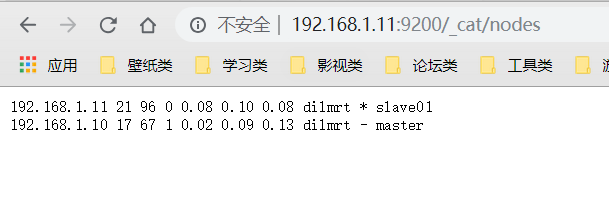
成功的结果图

9200端口用于外部协议,基于http协议,程序与es的通信使用9200端口
9300是通过tcp协议通信,遵循tcp协议,es集群中的节点之间也通过9300端口进行通信